How to Create Personalized Gift Tags and Ribbons
There is a distinct magic in the act of giving a thoughtfully wrapped present. While the item inside matters, the first impression is created by how it looks before it is even opened. In a world dominated by digital transactions and mass-produced convenience, taking the time to craft personalized gift tags and ribbons transforms a simple box into a curated experience. It signals effort, care, and attention to detail—qualities that resonate deeply with recipients.
This approach goes beyond standard store-bought accessories. By designing your own elements, you ensure that every piece of packaging aligns perfectly with the theme of the gift, the personality of the recipient, or the aesthetic of the occasion. Whether you are preparing for a holiday season filled with dozens of presents or a single milestone birthday, learning to create custom embellishments allows you to elevate your gifting game significantly.
The Art of Cohesive Design
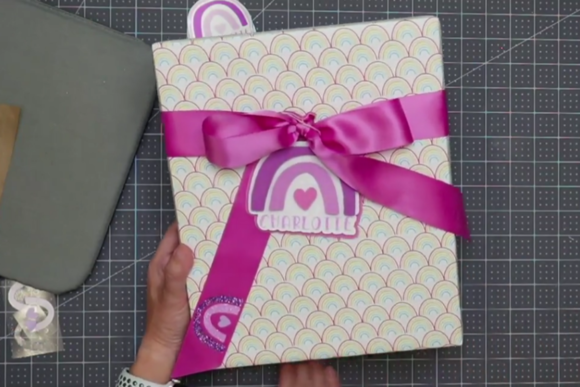
One of the most compelling aspects of DIY packaging is the ability to achieve visual harmony. When you design your own tags and ribbon toppers, you have complete control over color palettes, typography, and motifs. This ensures that your wrapping paper does not compete with the tag but rather complements it. For instance, if you are using a bold, geometric wrapping paper, a minimalist tag with clean lines creates a sophisticated contrast. Conversely, a floral pattern might pair beautifully with a hand-lettered script tag.
Cricut expert An Pham demonstrates how this process can be both accessible and highly effective. The goal is not necessarily to become a master graphic designer overnight, but to use available tools to create designs that feel intentional. By matching the tag to the wrapping paper, you create a unified look that feels professional and polished. This cohesion is what makes a gift stand out on a table full of other presents; it catches the eye through consistency rather than chaos.
Leveraging Digital Tools for Precision
The integration of digital cutting machines, such as Cricut or Silhouette, has democratized high-quality crafting. These tools allow users to cut intricate shapes from cardstock, vinyl, or even fabric with precision that is difficult to achieve by hand. For creating personalized gift tags, this means you can produce sharp edges, complex patterns, and consistent text across multiple items.
An Pham’s guidance emphasizes the importance of starting with a solid design file. Using pre-made SVG files provides a strong foundation, allowing you to focus on customization rather than starting from a blank canvas. These files often include optimized paths for cutting, ensuring that your machine handles the material smoothly. Additionally, pairing these designs with complementary fonts enhances readability and style. A well-chosen font can convey warmth, elegance, or playfulness, setting the tone for the gift before it is unwrapped.
Customization Strategies for Different Audiences
Personalization is not just about adding a name; it is about tailoring the message to the relationship between giver and receiver. Here are several ways to adapt your designs for different contexts:
- For Family Members: Consider incorporating family names, birth years, or inside jokes. A tag featuring a small illustration of a shared hobby, like hiking or cooking, adds a layer of sentimental value. You might use warm, earthy tones and sturdy cardstock to reflect reliability and comfort.
- For Professional Contacts: Keep designs clean and minimalist. Monochromatic schemes with elegant serif fonts project professionalism. A simple logo or initials embossed or printed on high-quality matte paper can serve as a memorable business gift tag without being overly casual.
- For Children: Bright colors, fun characters, and interactive elements work best. Consider creating tags that double as activity sheets, such as a "coloring" tag where the child can add their own artwork. This extends the joy of receiving the gift into an engaging experience.
- For Friends: Experiment with trendy aesthetics, such as boho, retro, or modern minimalist styles. Use vibrant ribbons and mixed textures to create a tactile experience. Handwritten notes added to digitally printed tags bridge the gap between technology and personal touch.
Practical Steps to Get Started
Creating these custom elements is straightforward when you break it down into manageable steps. The inclusion of downloadable resources, such as specific fonts and SVG files, lowers the barrier to entry for beginners. Here is a practical workflow to follow:
- Select Your Base Design: Choose an SVG file that resonates with your theme. Look for designs that offer flexibility, such as those with open spaces for text or simple shapes that can be easily colored.
- Customize Text and Colors: Use design software to input recipient names, short messages, or dates. Experiment with font pairings—one decorative font for the name and a simpler sans-serif for the message often works well. Adjust colors to match your wrapping paper.
- Prepare Materials: Select appropriate materials. For durability, thick cardstock is ideal for tags. For ribbons, consider using vinyl cuts that adhere directly to satin or grosgrain ribbons, or create fabric toppers for a softer look.
- Cut and Assemble: Load your materials into your cutting machine. Once cut, carefully weed away excess material. Attach the tags using jute twine, metallic thread, or adhesive dots depending on the desired aesthetic.
- Add Finishing Touches: Consider adding wax seals, dried flowers, or small charms to enhance the luxury feel. These small details make the tag feel unique and handmade.
Maintaining Consistency and Organization
When dealing with multiple gifts, organization becomes key. Keeping a library of successful designs allows you to reuse and adapt them quickly. Save your favorite SVG configurations and note which color combinations worked best. This system saves time during busy seasons like Christmas or weddings.
Furthermore, maintaining consistency in your branding or style helps reinforce your personal touch. If you frequently give gifts, developing a recognizable style—whether it’s a specific color palette or a recurring motif—can become part of your identity as a thoughtful giver. Recipients may begin to anticipate the creative effort behind each package, adding to the excitement of the occasion.
Why This Effort Matters
In an era of instant gratification, the tangible nature of handmade tags offers a pause for reflection. It invites the recipient to slow down and appreciate the craftsmanship involved. Studies in psychology suggest that handwritten and handmade gestures trigger stronger emotional responses than generic ones. By investing time in creating personalized gift tags and ribbons, you are investing in the memory of the moment.
The combination of digital precision and human creativity results in products that are both efficient to produce and deeply personal. With access to expert-led classes and downloadable assets, anyone can achieve professional-looking results. The key is to start simple, experiment with different styles, and always keep the recipient’s preferences in mind.
Conclusion
Transforming ordinary gifts into extraordinary experiences is within reach for anyone willing to put in a little effort. By mastering the creation of personalized gift tags and ribbons, you add a layer of sophistication and sentimentality that mass-produced packaging cannot replicate. Whether you are a seasoned crafter or a curious beginner, the ability to design cohesive, meaningful packaging is a valuable skill. It turns the act of giving into an art form, ensuring that your gifts are not just received, but remembered. Embrace the creativity, utilize the available tools, and watch as your presents stand out with a unique charm that reflects your care and attention.